{{forfatter}}
{{utdrag ord = "100"}} ... Les mer
{{{Paginering}}}
{{/hvis}} De blogging plattform Ghost har fått mye oppmerksomhet nylig på grunn av den siste flyttingen fra beta til offentlig utgivelse (hvis du på en eller annen måte ikke har hørt om det ennå, Hodet over her og lese opp).
Som andre plattformer støtter Ghost tredjeparts temaer. I denne artikkelen skal vi designe en enkel, responsiv og innholdsdrevet blogg. Kode deretter det til et fullt funksjonelt tema for Ghost.
Standardtemaet for Ghost, 'Casper', ser veldig rent ut. De legger inn innhold først og viser typografi med en moderne fargepalett, slik at fokuset ligger på skrivingen.
Vi skal følge den ledelsen, så vår designprosess må starte med å forstå hvordan Ghost fungerer og hva som er tilgjengelig for brukeren i back-end. Det er 4 hovedelementer som vi kan trekke på fra baksiden mens du designer temaet (bortsett fra artiklene / innleggene selvsagt) som er:
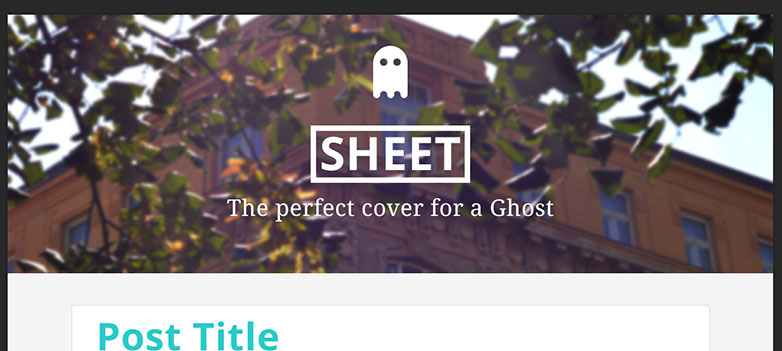
Alt som kan settes i fanen Innstillinger i Ghost. Disse peker utformingen i en åpenbar retning av en slags banner øverst på siden, som inneholder tittel, logo og beskrivelse og et omslagsbilde som bakgrunn.
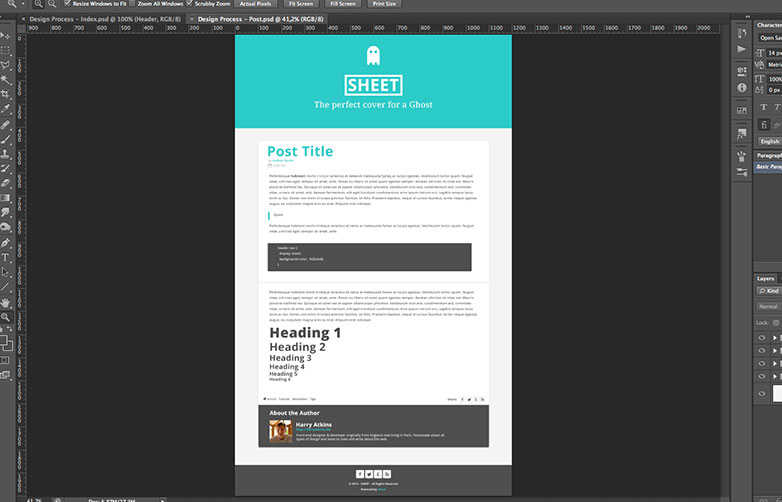
Så vi trenger egentlig bare å designe 2 sider, det er hjemmesiden, som viser alle de siste innleggene, og den enkelte innleggssiden. Da designen er relativt enkel, viser jeg den ferdige siden først, og deretter går du over detaljene igjen. Så her er "hjemme" siden som viser de nyeste innleggene:

Så som du kan se, fargerike høydepunkter, sammen med grunnleggende og rent design. La oss løpe over detaljene igjen. Så vi har overskriften, som inneholder logoen (her har jeg laget et lite arkdragt for et spøkelse), navnet på bloggen og beskrivelsen.
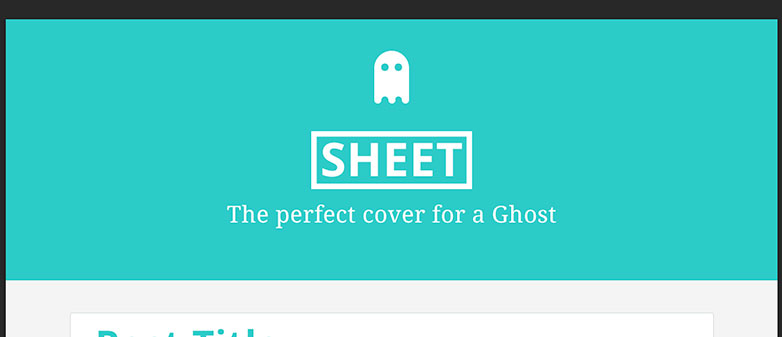
Så hvis brukeren velger et omslagsfoto, legger vi det inn som et fullverdig bakgrunnsbilde her. Hvis ikke, vil vi gå for en solid blå farge som vil være vår høydefarge som ovenfor.
Deretter har vi noen innholdskasser der vi vil vise all informasjon om hvert innlegg (tittel, publisert dato, forfatter, koder) og utdraget.
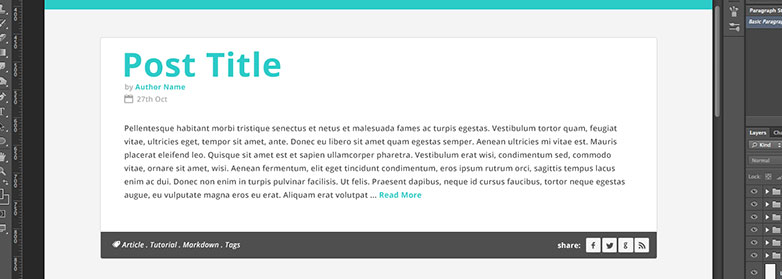
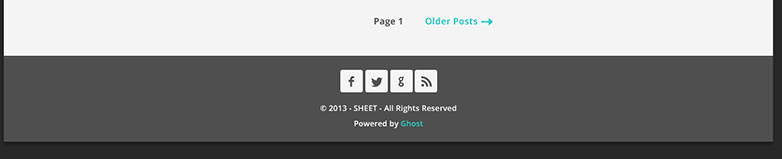
Til slutt lager vi en enkel pagineringskobling og en bunntekst. I delingsboksen artikkel, bunnteksten og hele hele nettstedet bruker vi en egendefinert ikonfonter laget på Fontello og skrifttypen Åpne Sans fra Google Web Fonts. Som vi ser hvordan du implementerer senere.
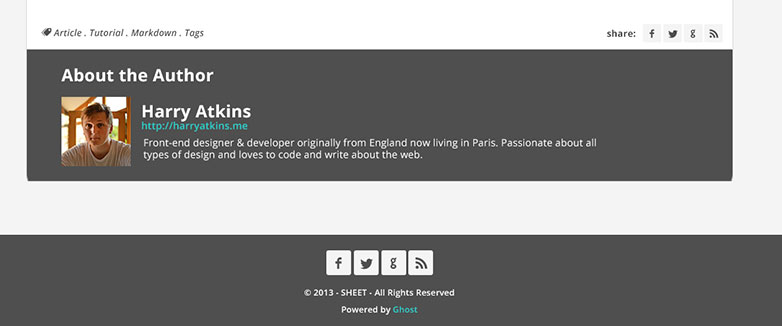
Denne utformingen ligner veldig på hjemmesiden. Bortsett fra blokken der vi vedlagt utsnittet før, vil det nå strekke full høyde og vise alt innholdet. I tillegg legger vi til en forfatterboks nederst.
Så alt det samme, bortsett fra noen inline tekst styling som vi vil gå over i utviklingsstadiet. Og her er den nye forfatterboksen:
Ok, så nå har designen blitt sett over (og selvsagt tilpasse det til dine egne preferanser). Det er på tide å starte utviklingen. Først av alt, hvis du ikke allerede har gjort det, ta et sekund og les den offisielle Ghost dokumentasjon om temaopprettelse. De er veldig klare og konsise om hva som trengs og filstruktur og så videre. I utgangspunktet for denne opplæringen kan vi dele utviklingen i to faser. Innhold og stil. Som et grunnleggende forhold mellom HTML og CSS, gjør vi temaarbeidet, så det ser ut som vårt design.
For å begynne må du ha Ghost installert lokalt på maskinen din. Dette er relativt rett fram til å gjøre, og det er nå selv automatiske installatører (som denne ). Når det er installert og kjører, må du finne spøkelsesmappen som heter 'spøkelsesversjon.number' (når det skrives er det 'spøkelse-0.3.2'). Når du er plassert, naviger til 'innhold / temaer', der vil du opprette en ny mappe som har navnet på ditt tema. Så i dette tilfellet vil vi kalle det 'ark'. I den mappen skal vi lage 2 filer som er essensielle for et Ghost-tema. Det er 'index.hbs' og 'post.hbs', hvis du har lest Ghost-dokumentasjonen (eller har brukt Handlebars andre steder), vil du gjenkjenne filformatet '.hbs', som betyr at vi kan bruke de såkalte "styrene" : {{}} i vår mal.
Deretter legger vi til en annen fil som heter 'default.hbs' og en mappestruktur for våre eiendeler og delvise filer. Følg denne filstrukturen:
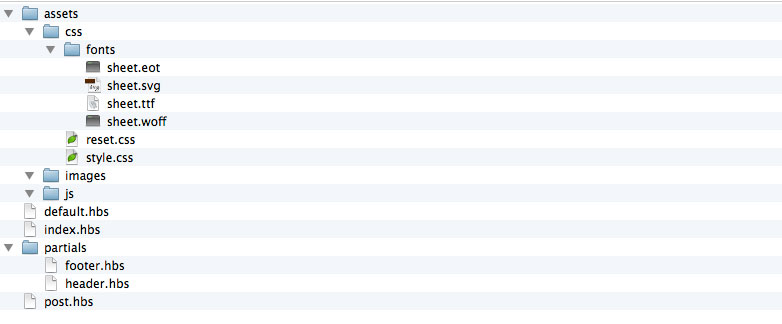
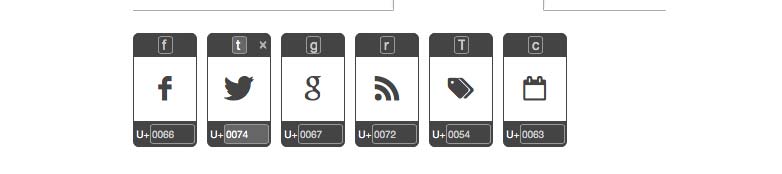
På 'assets / css / fonts' plasserer vi våre fontfiler for ikonet for @ font-face-implementeringen. For dette designet har jeg bare valgt 6 ikoner: Facebook, Twitter, Google, RSS, Merker, Kalender.
Bortsett fra det er resten av filene ganske selvforklarende. La oss nå komme inn i koden. Vi ser først på de to essensielle filene i temaet.
Når det gjelder designene, gir jeg hele innholdet i filen først, så bryter vi opp viktige biter. Først av alt "index.hbs" -filen:
{{!< default}}{{> header}}{{#foreach posts}}{{forfatter}}
{{utdrag ord = "100"}} ... Les mer
{{/ foreach}} {{# hvis paginering}} {{{Paginering}}} {{/hvis}} {{> bunntekst}} So to explain what's happening, the very first line is essential to the theme and tell us that this file will be inserted into the content area into the default file. The second line then inserts our header. Instead of putting it into this file we'll create a partial file later in the 'partials' directory. HBS files are just like HTML files in which you can include normal HTML elements. So the next element in the file is a which will hold all of our main content. Then inside of the repeater we'll put our article element that will contain the post. Inside each there will be a with the title and the meta data of the article (author and publish date). After that the actual excerpt. Then a that has our post's tags (in between an 'if' statement) and the share links, with some span's calling in our icon font. Finally we have some pagination, and we eventually call in the which works like the header. So as you can see it's relatively simple code. Obviously any class or ID names are optional for CSS styling. Next up comes the 'post.hbs' file. Which is mostly similar, but with a few additions and modifications. /">← Go Back {{title}} by {{author}} {{date format='DD MMM YYYY'}} {{content}} {{#if tags}} Tags: {{tags separator=" . "}} {{/if}} Share: {{#if author}} About the Author {{#if author.image}} {{/if}} {{author.name}} {{#if author.website}} {{author.website}} {{/if}} {{author.bio}} {{/if}}{{/post}} {{> footer}} Once again we have the and handlebars. And our element. But this time the wrapping handlebar is Then we call in the (Not excerpt, because this is the individual page we want to show all of the content in the post.) Another difference here is the 'if' statement which is verifying if there's an author for the post. If there is we'll show a box with the author's image, name, URL and bio. All of these elements are editable in the back-end by the user, and will either show up or not depending on whether they exist. 'default.hbs' and the partial files Now we're going to look at the default.hbs file. So if you haven't made it yet, create a new file. In that file we're going to put all the default things that are needed for our page to display correctly in a browser, mainly the doctype and the , and tags. {{ghost_head}} {{{body}}} {{ghost_foot}}
{{!< default}} So to explain what's happening, the very first line is essential to the theme and tell us that this file will be inserted into the content area into the default file. The second line then inserts our header. Instead of putting it into this file we'll create a partial file later in the 'partials' directory. HBS files are just like HTML files in which you can include normal HTML elements. So the next element in the file is a which will hold all of our main content. Then inside of the repeater we'll put our article element that will contain the post. Inside each there will be a with the title and the meta data of the article (author and publish date). After that the actual excerpt. Then a that has our post's tags (in between an 'if' statement) and the share links, with some span's calling in our icon font. Finally we have some pagination, and we eventually call in the which works like the header. So as you can see it's relatively simple code. Obviously any class or ID names are optional for CSS styling. Next up comes the 'post.hbs' file. Which is mostly similar, but with a few additions and modifications. /">← Go Back {{title}} by {{author}} {{date format='DD MMM YYYY'}} {{content}} {{#if tags}} Tags: {{tags separator=" . "}} {{/if}} Share: {{#if author}} About the Author {{#if author.image}} {{/if}} {{author.name}} {{#if author.website}} {{author.website}} {{/if}} {{author.bio}} {{/if}}{{/post}} {{> footer}} Once again we have the and handlebars. And our element. But this time the wrapping handlebar is Then we call in the (Not excerpt, because this is the individual page we want to show all of the content in the post.) Another difference here is the 'if' statement which is verifying if there's an author for the post. If there is we'll show a box with the author's image, name, URL and bio. All of these elements are editable in the back-end by the user, and will either show up or not depending on whether they exist. 'default.hbs' and the partial files Now we're going to look at the default.hbs file. So if you haven't made it yet, create a new file. In that file we're going to put all the default things that are needed for our page to display correctly in a browser, mainly the doctype and the , and tags. {{ghost_head}} {{{body}}} {{ghost_foot}}
{{> header}} So to explain what's happening, the very first line is essential to the theme and tell us that this file will be inserted into the content area into the default file. The second line then inserts our header. Instead of putting it into this file we'll create a partial file later in the 'partials' directory. HBS files are just like HTML files in which you can include normal HTML elements. So the next element in the file is a which will hold all of our main content. Then inside of the repeater we'll put our article element that will contain the post. Inside each there will be a with the title and the meta data of the article (author and publish date). After that the actual excerpt. Then a that has our post's tags (in between an 'if' statement) and the share links, with some span's calling in our icon font. Finally we have some pagination, and we eventually call in the which works like the header. So as you can see it's relatively simple code. Obviously any class or ID names are optional for CSS styling. Next up comes the 'post.hbs' file. Which is mostly similar, but with a few additions and modifications. /">← Go Back {{title}} by {{author}} {{date format='DD MMM YYYY'}} {{content}} {{#if tags}} Tags: {{tags separator=" . "}} {{/if}} Share: {{#if author}} About the Author {{#if author.image}} {{/if}} {{author.name}} {{#if author.website}} {{author.website}} {{/if}} {{author.bio}} {{/if}}{{/post}} {{> footer}} Once again we have the and handlebars. And our element. But this time the wrapping handlebar is Then we call in the (Not excerpt, because this is the individual page we want to show all of the content in the post.) Another difference here is the 'if' statement which is verifying if there's an author for the post. If there is we'll show a box with the author's image, name, URL and bio. All of these elements are editable in the back-end by the user, and will either show up or not depending on whether they exist. 'default.hbs' and the partial files Now we're going to look at the default.hbs file. So if you haven't made it yet, create a new file. In that file we're going to put all the default things that are needed for our page to display correctly in a browser, mainly the doctype and the , and tags. {{ghost_head}} {{{body}}} {{ghost_foot}}
{{/if}} {{author.name}} {{#if author.website}} {{author.website}} {{/if}} {{author.bio}} {{/if}}{{/post}} {{> footer}} Once again we have the and handlebars. And our element. But this time the wrapping handlebar is Then we call in the (Not excerpt, because this is the individual page we want to show all of the content in the post.) Another difference here is the 'if' statement which is verifying if there's an author for the post. If there is we'll show a box with the author's image, name, URL and bio. All of these elements are editable in the back-end by the user, and will either show up or not depending on whether they exist. 'default.hbs' and the partial files Now we're going to look at the default.hbs file. So if you haven't made it yet, create a new file. In that file we're going to put all the default things that are needed for our page to display correctly in a browser, mainly the doctype and the , and tags. {{ghost_head}} {{{body}}} {{ghost_foot}}
{{#foreach posts}} So to explain what's happening, the very first line is essential to the theme and tell us that this file will be inserted into the content area into the default file. The second line then inserts our header. Instead of putting it into this file we'll create a partial file later in the 'partials' directory. HBS files are just like HTML files in which you can include normal HTML elements. So the next element in the file is a which will hold all of our main content. Then inside of the repeater we'll put our article element that will contain the post. Inside each there will be a with the title and the meta data of the article (author and publish date). After that the actual excerpt. Then a that has our post's tags (in between an 'if' statement) and the share links, with some span's calling in our icon font. Finally we have some pagination, and we eventually call in the which works like the header. So as you can see it's relatively simple code. Obviously any class or ID names are optional for CSS styling. Next up comes the 'post.hbs' file. Which is mostly similar, but with a few additions and modifications. /">← Go Back {{title}} by {{author}} {{date format='DD MMM YYYY'}} {{content}} {{#if tags}} Tags: {{tags separator=" . "}} {{/if}} Share: {{#if author}} About the Author {{#if author.image}} {{/if}} {{author.name}} {{#if author.website}} {{author.website}} {{/if}} {{author.bio}} {{/if}}{{/post}} {{> footer}} Once again we have the and handlebars. And our element. But this time the wrapping handlebar is Then we call in the (Not excerpt, because this is the individual page we want to show all of the content in the post.) Another difference here is the 'if' statement which is verifying if there's an author for the post. If there is we'll show a box with the author's image, name, URL and bio. All of these elements are editable in the back-end by the user, and will either show up or not depending on whether they exist. 'default.hbs' and the partial files Now we're going to look at the default.hbs file. So if you haven't made it yet, create a new file. In that file we're going to put all the default things that are needed for our page to display correctly in a browser, mainly the doctype and the , and tags. {{ghost_head}} {{{body}}} {{ghost_foot}}
{{/if}} {{author.name}} {{#if author.website}} {{author.website}} {{/if}} {{author.bio}} {{/if}}{{/post}} {{> footer}} Once again we have the and handlebars. And our element. But this time the wrapping handlebar is Then we call in the (Not excerpt, because this is the individual page we want to show all of the content in the post.) Another difference here is the 'if' statement which is verifying if there's an author for the post. If there is we'll show a box with the author's image, name, URL and bio. All of these elements are editable in the back-end by the user, and will either show up or not depending on whether they exist. 'default.hbs' and the partial files Now we're going to look at the default.hbs file. So if you haven't made it yet, create a new file. In that file we're going to put all the default things that are needed for our page to display correctly in a browser, mainly the doctype and the , and tags. {{ghost_head}} {{{body}}} {{ghost_foot}}
{{/if}} {{author.name}} {{#if author.website}} {{author.website}} {{/if}} {{author.bio}} {{/if}}{{/post}} {{> footer}} Once again we have the and handlebars. And our element. But this time the wrapping handlebar is Then we call in the (Not excerpt, because this is the individual page we want to show all of the content in the post.) Another difference here is the 'if' statement which is verifying if there's an author for the post. If there is we'll show a box with the author's image, name, URL and bio. All of these elements are editable in the back-end by the user, and will either show up or not depending on whether they exist. 'default.hbs' and the partial files Now we're going to look at the default.hbs file. So if you haven't made it yet, create a new file. In that file we're going to put all the default things that are needed for our page to display correctly in a browser, mainly the doctype and the , and tags. {{ghost_head}} {{{body}}} {{ghost_foot}}
{{> footer}} So to explain what's happening, the very first line is essential to the theme and tell us that this file will be inserted into the content area into the default file. The second line then inserts our header. Instead of putting it into this file we'll create a partial file later in the 'partials' directory. HBS files are just like HTML files in which you can include normal HTML elements. So the next element in the file is a which will hold all of our main content. Then inside of the repeater we'll put our article element that will contain the post. Inside each there will be a with the title and the meta data of the article (author and publish date). After that the actual excerpt. Then a that has our post's tags (in between an 'if' statement) and the share links, with some span's calling in our icon font. Finally we have some pagination, and we eventually call in the which works like the header. So as you can see it's relatively simple code. Obviously any class or ID names are optional for CSS styling. Next up comes the 'post.hbs' file. Which is mostly similar, but with a few additions and modifications. /">← Go Back {{title}} by {{author}} {{date format='DD MMM YYYY'}} {{content}} {{#if tags}} Tags: {{tags separator=" . "}} {{/if}} Share: {{#if author}} About the Author {{#if author.image}} {{/if}} {{author.name}} {{#if author.website}} {{author.website}} {{/if}} {{author.bio}} {{/if}}{{/post}} {{> footer}} Once again we have the and handlebars. And our element. But this time the wrapping handlebar is Then we call in the (Not excerpt, because this is the individual page we want to show all of the content in the post.) Another difference here is the 'if' statement which is verifying if there's an author for the post. If there is we'll show a box with the author's image, name, URL and bio. All of these elements are editable in the back-end by the user, and will either show up or not depending on whether they exist. 'default.hbs' and the partial files Now we're going to look at the default.hbs file. So if you haven't made it yet, create a new file. In that file we're going to put all the default things that are needed for our page to display correctly in a browser, mainly the doctype and the , and tags. {{ghost_head}} {{{body}}} {{ghost_foot}}
So to explain what's happening, the very first line is essential to the theme and tell us that this file will be inserted into the content area into the default file. The second line then inserts our header. Instead of putting it into this file we'll create a partial file later in the 'partials' directory. HBS files are just like HTML files in which you can include normal HTML elements. So the next element in the file is a which will hold all of our main content. Then inside of the repeater we'll put our article element that will contain the post. Inside each there will be a with the title and the meta data of the article (author and publish date). After that the actual excerpt. Then a that has our post's tags (in between an 'if' statement) and the share links, with some span's calling in our icon font. Finally we have some pagination, and we eventually call in the which works like the header. So as you can see it's relatively simple code. Obviously any class or ID names are optional for CSS styling. Next up comes the 'post.hbs' file. Which is mostly similar, but with a few additions and modifications. /">← Go Back {{title}} by {{author}} {{date format='DD MMM YYYY'}} {{content}} {{#if tags}} Tags: {{tags separator=" . "}} {{/if}} Share: {{#if author}} About the Author {{#if author.image}} {{/if}} {{author.name}} {{#if author.website}} {{author.website}} {{/if}} {{author.bio}} {{/if}}{{/post}} {{> footer}} Once again we have the and handlebars. And our element. But this time the wrapping handlebar is Then we call in the (Not excerpt, because this is the individual page we want to show all of the content in the post.) Another difference here is the 'if' statement which is verifying if there's an author for the post. If there is we'll show a box with the author's image, name, URL and bio. All of these elements are editable in the back-end by the user, and will either show up or not depending on whether they exist. 'default.hbs' and the partial files Now we're going to look at the default.hbs file. So if you haven't made it yet, create a new file. In that file we're going to put all the default things that are needed for our page to display correctly in a browser, mainly the doctype and the , and tags. {{ghost_head}} {{{body}}} {{ghost_foot}}
{{!< default}}{{> header}}{{#post}}{{{url}}}">{{title}} by {{author}} {{date format='DD MMM YYYY'}} {{content}} {{#if tags}} Tags: {{tags separator=" . "}} {{/if}} Share: {{#if author}} About the Author {{#if author.image}} {{/if}} {{author.name}} {{#if author.website}} {{author.website}} {{/if}} {{author.bio}} {{/if}}{{/post}} {{> footer}} Once again we have the and handlebars. And our element. But this time the wrapping handlebar is Then we call in the (Not excerpt, because this is the individual page we want to show all of the content in the post.) Another difference here is the 'if' statement which is verifying if there's an author for the post. If there is we'll show a box with the author's image, name, URL and bio. All of these elements are editable in the back-end by the user, and will either show up or not depending on whether they exist. 'default.hbs' and the partial files Now we're going to look at the default.hbs file. So if you haven't made it yet, create a new file. In that file we're going to put all the default things that are needed for our page to display correctly in a browser, mainly the doctype and the , and tags. {{ghost_head}} {{{body}}} {{ghost_foot}}
So to explain what's happening, the very first line is essential to the theme and tell us that this file will be inserted into the content area into the default file. The second line then inserts our header. Instead of putting it into this file we'll create a partial file later in the 'partials' directory. HBS files are just like HTML files in which you can include normal HTML elements. So the next element in the file is a which will hold all of our main content. Then inside of the repeater we'll put our article element that will contain the post. Inside each there will be a with the title and the meta data of the article (author and publish date). After that the actual excerpt. Then a that has our post's tags (in between an 'if' statement) and the share links, with some span's calling in our icon font. Finally we have some pagination, and we eventually call in the which works like the header. So as you can see it's relatively simple code. Obviously any class or ID names are optional for CSS styling. Next up comes the 'post.hbs' file. Which is mostly similar, but with a few additions and modifications. /">← Go Back {{title}} by {{author}} {{date format='DD MMM YYYY'}} {{content}} {{#if tags}} Tags: {{tags separator=" . "}} {{/if}} Share: {{#if author}} About the Author {{#if author.image}}
So to explain what's happening, the very first line is essential to the theme and tell us that this file will be inserted into the content area into the default file. The second line then inserts our header. Instead of putting it into this file we'll create a partial file later in the 'partials' directory. HBS files are just like HTML files in which you can include normal HTML elements. So the next element in the file is a which will hold all of our main content. Then inside of the repeater we'll put our article element that will contain the post. Inside each there will be a with the title and the meta data of the article (author and publish date). After that the actual excerpt. Then a that has our post's tags (in between an 'if' statement) and the share links, with some span's calling in our icon font. Finally we have some pagination, and we eventually call in the which works like the header. So as you can see it's relatively simple code. Obviously any class or ID names are optional for CSS styling. Next up comes the 'post.hbs' file. Which is mostly similar, but with a few additions and modifications. /">← Go Back {{title}} by {{author}} {{date format='DD MMM YYYY'}} {{content}} {{#if tags}} Tags: {{tags separator=" . "}} {{/if}} Share: {{#if author}} About the Author {{#if author.image}}
So to explain what's happening, the very first line is essential to the theme and tell us that this file will be inserted into the content area into the default file. The second line then inserts our header. Instead of putting it into this file we'll create a partial file later in the 'partials' directory. HBS files are just like HTML files in which you can include normal HTML elements. So the next element in the file is a which will hold all of our main content. Then inside of the repeater we'll put our article element that will contain the post. Inside each there will be a with the title and the meta data of the article (author and publish date). After that the actual excerpt. Then a that has our post's tags (in between an 'if' statement) and the share links, with some span's calling in our icon font. Finally we have some pagination, and we eventually call in the which works like the header. So as you can see it's relatively simple code. Obviously any class or ID names are optional for CSS styling. Next up comes the 'post.hbs' file. Which is mostly similar, but with a few additions and modifications. /">← Go Back {{title}} by {{author}} {{date format='DD MMM YYYY'}} {{content}} {{#if tags}} Tags: {{tags separator=" . "}} {{/if}} Share: {{#if author}} About the Author {{#if author.image}}So to explain what's happening, the very first line is essential to the theme and tell us that this file will be inserted into the content area into the default file. The second line then inserts our header. Instead of putting it into this file we'll create a partial file later in the 'partials' directory. HBS files are just like HTML files in which you can include normal HTML elements. So the next element in the file is a which will hold all of our main content. Then inside of the repeater we'll put our article element that will contain the post. Inside each there will be a with the title and the meta data of the article (author and publish date). After that the actual excerpt. Then a that has our post's tags (in between an 'if' statement) and the share links, with some span's calling in our icon font. Finally we have some pagination, and we eventually call in the which works like the header. So as you can see it's relatively simple code. Obviously any class or ID names are optional for CSS styling. Next up comes the 'post.hbs' file. Which is mostly similar, but with a few additions and modifications. /">← Go Back {{title}} by {{author}} {{date format='DD MMM YYYY'}} {{content}} {{#if tags}} Tags: {{tags separator=" . "}} {{/if}} Share: {{#if author}} About the Author {{#if author.image}}So to explain what's happening, the very first line is essential to the theme and tell us that this file will be inserted into the content area into the default file. The second line then inserts our header. Instead of putting it into this file we'll create a partial file later in the 'partials' directory. HBS files are just like HTML files in which you can include normal HTML elements. So the next element in the file is a which will hold all of our main content. Then inside of the repeater we'll put our article element that will contain the post. Inside each there will be a with the title and the meta data of the article (author and publish date). After that the actual excerpt. Then a that has our post's tags (in between an 'if' statement) and the share links, with some span's calling in our icon font. Finally we have some pagination, and we eventually call in the which works like the header. So as you can see it's relatively simple code. Obviously any class or ID names are optional for CSS styling. Next up comes the 'post.hbs' file. Which is mostly similar, but with a few additions and modifications. /">← Go Back {{title}} by {{author}} {{date format='DD MMM YYYY'}} {{content}} {{#if tags}} Tags: {{tags separator=" . "}} {{/if}} Share: {{#if author}} About the Author {{#if author.image}}So to explain what's happening, the very first line is essential to the theme and tell us that this file will be inserted into the content area into the default file. The second line then inserts our header. Instead of putting it into this file we'll create a partial file later in the 'partials' directory. HBS files are just like HTML files in which you can include normal HTML elements. So the next element in the file is a which will hold all of our main content. Then inside of the repeater we'll put our article element that will contain the post. Inside each there will be a with the title and the meta data of the article (author and publish date). After that the actual excerpt. Then a that has our post's tags (in between an 'if' statement) and the share links, with some span's calling in our icon font. Finally we have some pagination, and we eventually call in the which works like the header. So as you can see it's relatively simple code. Obviously any class or ID names are optional for CSS styling. Next up comes the 'post.hbs' file. Which is mostly similar, but with a few additions and modifications. /">← Go Back {{title}} by {{author}} {{date format='DD MMM YYYY'}} {{content}} {{#if tags}} Tags: {{tags separator=" . "}} {{/if}} Share: {{#if author}} About the Author {{#if author.image}}So to explain what's happening, the very first line is essential to the theme and tell us that this file will be inserted into the content area into the default file. The second line then inserts our header. Instead of putting it into this file we'll create a partial file later in the 'partials' directory. HBS files are just like HTML files in which you can include normal HTML elements. So the next element in the file is a which will hold all of our main content. Then inside of the repeater we'll put our article element that will contain the post. Inside each there will be a with the title and the meta data of the article (author and publish date). After that the actual excerpt. Then a that has our post's tags (in between an 'if' statement) and the share links, with some span's calling in our icon font. Finally we have some pagination, and we eventually call in the which works like the header. So as you can see it's relatively simple code. Obviously any class or ID names are optional for CSS styling. Next up comes the 'post.hbs' file. Which is mostly similar, but with a few additions and modifications. /">← Go Back {{title}} by {{author}} {{date format='DD MMM YYYY'}} {{content}} {{#if tags}} Tags: {{tags separator=" . "}} {{/if}} Share: {{#if author}} About the Author {{#if author.image}}